Posted on Leave a comment

The Spider that bit Peter Parker has no name?

In the shadows of an abandoned laboratory, where dust settled like forgotten dreams, lived a black widow spider unlike any other. She was a spider like no other, for she was Radioactive.

I will call her RAD.

Black Widow Spider Art

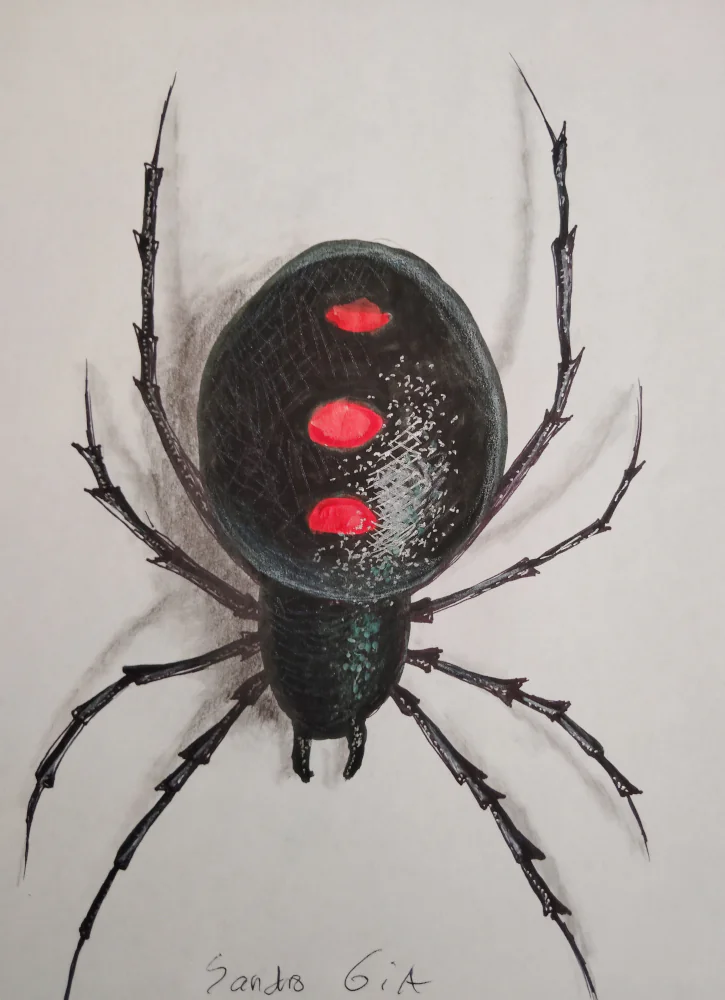
To most, she was just another venomous creature, lurking in corners, feared and avoided. But inside her silken web, RAD carried centuries of hunger and a mind sharp with malice.

She watched the humans who stumbled into her world—fragile giants who never noticed her until it was too late. Yet one night, a boy entered. Not just any boy—Peter Parker. His hands trembled as he reached for the equipment that would change his destiny.

Rad sensed something in him: light, hope, the possibility of greatness. And in her twisted heart, she loathed it. For what was a creature born in darkness if not the eternal enemy of hope?

She crept silently down her web, each step deliberate, like a drumbeat of fate. When her fangs pierced his skin, it wasn’t just venom that flowed—it was a curse, a dark echo of her own essence. Peter staggered, unaware of the storm he carried within him.

To the world, it became the tale of a hero’s birth: Spider-Man, the protector of the innocent. But to rad, it was a cruel joke. For every time he swung above the city, every life he saved, her shadow lingered. He was not only a man of the people—he was her legacy too.

And somewhere in the silence of forgotten corners, rad watched. Waiting. Whispering to the dark: “Even heroes are born of venom.”

There you have it, RAD the spider that created Spider Man now has a name, and a greater place in the history of comics.

Posted on Leave a comment

How to Draw a Tiger – Step by Step Tutorial

Tigers can be a challenge to draw, getting big cat anatomy just right with all the fur and stripes requires serious attention to details. This guide will make that process much easier. This free tutorial on how to draw a tiger will walk you thru creativity process step by step.

If you really want to draw or paint cats or tigers realistically, then start mastering tiger anatomy. The best part about learning to draw anything is you do not need to spend much money. A pencil and a piece of paper is all you need to get started on your artistic journey. I ususually begin sketcing rough ideas using a pen and paper. In the first stage, you should only focus on ideas, composition and large objects. Try crearing about five to ten sketching ideas, then start to refine a little more detail on the next stage.

This tutorial will show you how to draw or paint a tiger in four simple steps

Step 1: Create five simple drawings of a tiger. Notice the lack of detail, the anatomy has mistakes, and its a simple black and white sketch. It’s ok to make mistakes at this stage of the creative process, once you have find a satifactory design, you will begin refining details at the next step.

simple cat tiger drawings – do not worry about detail yet
Tiger Drawing Pen Paper Hunt
Tiger Drawing Pen Paper Hunt – start adding a little detail, with design
Tiger Drawing Pen Paper Hunt
Tiger Drawing Pen Paper Hunt – add grassy details and some shading

Step 2:

Try this approach. Using cotton canvas, transfer your original sketch image from step 2 to your canvas. Using scissors, carefull cut out tigers image outline, to use as a stencil. Then trace the outside of the tiger to your cotton canvas, this way you have a starting reference outline to work with.

Hand-drawn tiger sketch on white paper, pen art by Sandro Gia, placed on textured background with scissors
Original tiger sketch in pen, part of Sandro Gia’s wildlife art series
Original Drawing is cut and used as a stencil guided
Pencil, Eraser, and Pencil Shareper tools
Rough Sketch Completed

Step 3:

Now that you have an idea of tigers position, and composition, you can begin adding some details and color. At this stage, you should start thinking about shading, color and background ideas. Also plan on making the big cats anatomy more accurate by referencing any images you find online or from a book.

Again these are just ideas, no need to get detail oriented or fancy. You just need to know the subject matter, color and composition. But you also get to develop a strong line up of color studies to choose from.

Tiger Hunt Grass
Tiger Hunt Grass
Tiger Rear Head Study

While painting these new big cat creations, you will need some time to let them dry. I like to use this drying time oppurtuniny to create some other random paintings. This keeps the imagination flowing, and helps to bring out the creative accidental genious surprise piece you were not expecting. It’s bound to happen. You just start creating, and next thing you know it, 1 out of 5 expiremental skethes becomes an idea. You can stop here and run with it, or put that mini masterpiece in a shelf to be continued later. Below are some examples:

Tiger Male Majestic
Tiger Male Majestic
Almost Completed Artwork for a Show
Random Leopard Sketh ink on paper
Tiger Art Mixed Media

Posted on Leave a comment

How to Paint Flamingo Sunset

This video demonstration uses acrylic on cotton canvas. Starting with a pencil, lightly sketch the bird, then start soaking the cotton with water to allow the pigment to flow and create a soft luminous affect. Next you can fill in the animal with a pinkish red color, blue for water, and yellow for the background

Posted on Leave a comment

How to Draw a Bear

Easy Step-by-Step Pencil Drawing Tutorial for Beginners

Grizzly Bear Roar Art Acrylic Painting
Grizzly Bear Roar – Acrylic Painting

Learn how to draw a bear with this easy, step-by-step pencil drawing tutorial for beginners. Discover tools, anatomy, shading, and expert tips to sketch a realistic bear—even if you’re brand new to drawing.


Introduction: Why Drawing Bears Is Easier Than You Think!)

Have you ever seen a bear in a photo or nature documentary and thought, “That would be amazing to draw”? Bears are powerful, majestic, and surprisingly expressive—making them one of the most rewarding animals to sketch.

The best part? Drawing a bear isn’t as hard as it looks. By breaking it down into simple shapes and step-by-step details, you’ll be able to create a lifelike bear sketch, even if you’re a complete beginner.

This tutorial will guide you through the basics: from tools and anatomy to shading, textures, and background ideas. By the end, you’ll have your very own bear artwork to be proud of.

Grab your pencil—let’s begin!


Essential Drawing Tools You’ll Need to Sketch a Bear

No fancy art supplies required! Just gather these basics:

  • Pencils and Pens: Nothing fancy, since your just getting started.
  • Eraser: A kneaded eraser is perfect for lightening areas and correcting mistakes.
  • Blending Stump: For smooth shading and fur textures.
  • Paper: For getting started, you can use any type of paper, such as printing paper.
  • Sharpener: Always keep your pencils sharp for detail work.
  • Reference Image: A clear photo of a bear will help with proportions and shading.

Understanding Bear Anatomy: The Secret to Realistic Animal Drawings

Before you start sketching, it helps to know the bear’s basic structure. This is no small undertaking, because sketching animal anatomy is very challenging. Using a photo reference will be helpfull, but drawing from real life is key to mastering animal anatomy. Most artist seem to focus on details first, but rendering a decent animal drawing requires you to start with a broader design, such as composition, proportions and naturalness.

bear roaring sketch wildlife art by Sandro Gia
Pencil sketch of a roaring bear

How to draw a walking bear, in four easy steps.

This is a more of a dyanmic pose. Tilt the oval body forward and bend one leg. Add motion by lowering the head slightly.

Rough Sketch bear walking - pen on paper
Start with large oval shapes for the body, do not worry about details yet.
Rough Sketch bear walking - pen on paper
Make sure the paws are correct, and start adding some fur.
Rough Sketch bear walking - pen on paper
Now start blocking basic anatomy. This ensures the Bear looks more natureal, and add more fur detail, next step is to refine and shade.
FInal Sketch bear walking - pen on paper
FInal Sketch bear walking – Use short, overlapping strokes around the body to suggest fur.
Keep it rough and layered, not smooth. Shade the fur, legs, and face to add depth.
Darken shadow areas (under the belly, legs, and neck).

This tutorials show how to draw a bears head

Outline the Head and Face using large ovals, no details are needed yet.

A framed sketch of a bear head, part of a step-by-step bear drawing tutorial by wildlife artist Sandro Gia.
for this simple step-by-step drawing , keep it simple.
At this stage, your artwork looks like three circles, but it will eventually take shape.Add rounded ears on top of the head.
Draw the snout with a broad nose at the tip.
Place small eyes above the snout.
Lightly sketch a mouth line under the nose.
Bear Head Sketch
Start connecting the circles with a sweeping motion, and you will see the bear head take form.

Sketch of a bear head framed on paper, step in a bear drawing tutorial.
Add some shading to the head, and cut out a simple dark paper frame to see what your masterpiece looks like. The frame help us focus on composition.

Below are some rough painting sketchs I created using acrylic on cotton canvas:

Polar Bear Acrylic Painting  Grey White colorfull snow fall
Polar Bear Acrylic Painting Grey White colorfull snow fall
Curious bear and trees
Simple Rough Painting Sketch – Part 1

Bear Forest Tress Snow Walk
Simple Rough Painting Sketch – Part 2

Polar Bear Artwork Grey Stormy background
Grizzy Bear Water Falls art painting by Sandro Gia, nature wildlife painting wall decor
White water, rocks and grizzly and water falls.


Common Beginner Mistakes (and How to Fix Them)

MistakeFix
Making the bear too slimKeep the body wide and rounded
Oversized earsRemember: bear ears are small and rounded
Smooth fur linesUse short, rough strokes for texture
Paws too smallMake them big and flat for realism
Forgetting weightBears look heavy—give them a grounded stance

Secret Tip: Use a mirror to view your sketch, it assist artist by showing the subject’s anatomical mistakes